Kafka raft (KRaft) cluster configuration from dev to prod — part 1
In this series of posts, I will explain how to configure a Kafka raft (Kraft) cluster starting from the most basic configuration running in my local machine and with docker to the one that can be run in production in a Kubernetes cluster.
In this first post, understanding the following tools are prerequisites: Kafka, Zookeeper, Kafdrop, Docker, and Compose.
All the code will be available on my GitHub.
The basics
What is Kafka?
There are several articles online explaining what Kafka is used for and how to configure it. I will save myself from repetition and just recommend one article to understand the basics of Kafka:
Docker and Docker compose
Docker is a well-established container management tool and again there is plenty of content online to understand it. The documentation itself should be enough for you to get a grasp of it and further reading about Docker compose will give you all the information need to start having benefits from this article.
Ok, now that we have a basic understanding of the prerequisites for following this article, let’s deep-dive our topic of interest.
Kafka Raft (KRaft)
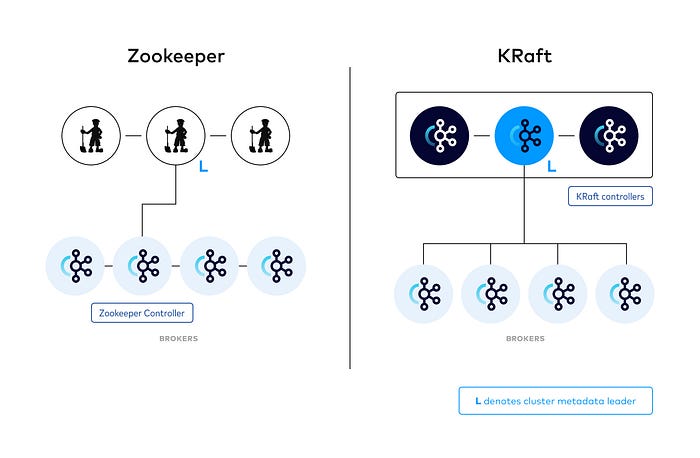
Kafka has historically needed the combined use of a separate service called Zookeeper for its metadata management. This caused an overhead in the necessary understanding and an increased complexity for having to configure two different services. In 2020, Zookeeper was replaced with a consensus protocol called Raft running in the Kafka service itself. This simplified the previous architecture and added benefits of improved stability; security model, networking and protocol communication unification, and fast failover. You should read more about KRaft and the Raft consensus algorithm to deepen your knowledge.

In the KRaft setup, the main difference is that instead of using Zookeeper services, you will use new Kafka services running as controllers to manage the cluster metadata.
We will run Kafka in a cluster configuration to increase availability and performance.
Cluster Configuration
As a rule of thumb, I try to always start the development of something new in a simple and controlled environment where I can easily understand what is going on and then build up from that. For this, Docker and Compose are great tools that pretty much replicate a simplified version of the setup that I will have in production (e.g. in a Kubernetes system). That being said, I will also start with the most basic “cluster” possible (running one node) and add the other from there.
Single-node cluster
First, we will add the controller and check the configuration to see if it is running correctly. It will look like the following:
version: "3"
services:
  controller-1:
    image: confluentinc/cp-kafka:7.5.0
    hostname: controller-1
    container_name: controller-1
    environment:
      KAFKA_PROCESS_ROLES: "controller"
      KAFKA_NODE_ID: 1
      KAFKA_LISTENERS: "CONTROLLER://controller-1:29092"
      KAFKA_CONTROLLER_QUORUM_VOTERS: "1@controller-1:29092"
      KAFKA_CONTROLLER_LISTENER_NAMES: "CONTROLLER"
      CLUSTER_ID: "MkU3OEVBNTcwNTJENDM2Qk" #unique base64 UUID
This is our initial docker-compose.yml file and we have configured the following environment variables:
- KAFKA_PROCESS_ROLES
- KAFKA_NODE_ID
- KAFKA_LISTENERS
- KAFKA_CONTROLLER_QUORUM_VOTERS
- KAFKA_CONTROLLER_LISTENER_NAMES
- CLUSTER_ID
All the variables are necessary and must be set. Each of them is described in detail in the Docker Configuration Parameters for Confluent Platform. Now let’s run it (docker compose up) and check the logs:

In the first green box:
- Kafka is running in KRaft mode (Zookeeper won’t be used)
In the second box:
- The Raft manager registered the node ID 1 as a voter (as configured via environment variable)
Now that we have a controller running, let’s add a broker to our docker compose configuration:
version: "3"
services:
  controller-1:
    image: confluentinc/cp-kafka:7.5.0
    hostname: controller-1
    container_name: controller-1
    environment:
      KAFKA_PROCESS_ROLES: "controller"
      KAFKA_NODE_ID: 1
      KAFKA_LISTENERS: "CONTROLLER://controller-1:29092"
      KAFKA_CONTROLLER_QUORUM_VOTERS: "1@controller-1:29092"
      KAFKA_CONTROLLER_LISTENER_NAMES: "CONTROLLER"
      CLUSTER_ID: "MkU3OEVBNTcwNTJENDM2Qk" #unique base64 UUID

  broker-1:
    image: confluentinc/cp-kafka:7.5.0
    hostname: broker-1
    container_name: broker-1
    environment:
      KAFKA_NODE_ID: 4
      KAFKA_PROCESS_ROLES: "broker"
      KAFKA_LISTENER_SECURITY_PROTOCOL_MAP: "CONTROLLER:PLAINTEXT,PLAINTEXT:PLAINTEXT"
      KAFKA_ADVERTISED_LISTENERS: "PLAINTEXT://broker-1:9092" # Required for brokers
      KAFKA_CONTROLLER_QUORUM_VOTERS: "1@controller-1:29092"
      KAFKA_CONTROLLER_LISTENER_NAMES: "CONTROLLER"
      KAFKA_LISTENERS: "PLAINTEXT://broker-1:9092"
      KAFKA_INTER_BROKER_LISTENER_NAME: "PLAINTEXT"
      CLUSTER_ID: "MkU3OEVBNTcwNTJENDM2Qk" #unique base64 UUID
We can find the reference for all the environment variables again here. But I will give my notes in three of them as to avoid confusion:
- KAFKA_NODE_ID: set to 4 on purpose as I plan to use 2 and 3 for other controllers. (could have been 2)
- KAFKA_LISTENERS: this is the address the broker will use to register itself as a listener. If this address is not available this would throw an error. This works because of how the Docker compose networking is configured.
- KAFKA_ADVERTISED_LISTENERS: this is the address the brokers will use to communicate with one another. This means that the other brokers must be able to resolve the set address.
Now let’s start the broker and check the logs of the services. First the controller, where we can see that a new broker was registered. (id=4).

In the broker we have the following:

First, the broker waits for the controller to acknowledge it and then transitions the state to RECOVERY to catch up with the running state.

After catching up, we can see the broker transitions the state to RUNNING. This indicates that the broker successfully registered itself and is up-to-date with the cluster state. At this point, we can exec into the broker or the controller and check the cluster metadata:

We can see that the node with ID 1 is registered as a voter and the one with ID 4 is registered as a broker. For further testing, we can create a topic and send a message:

Our one-node cluster is up and running. Now let’s improve the setup.
We know that single-node clusters lack redundancy and availability. In our case, it is even worse considering that if the controller or the broker fails our whole system will suffer a downtime. To solve this problem, we will add two controllers and two brokers. In the documentation, we can also see some extra production recommendations.
To add the extra controllers, we need to use environment variables to register them in the list of quorum voters. The controller’s config will look like the following:
version: "3"
services:
  controller-1:
    image: confluentinc/cp-kafka:7.5.0
    profiles:
      - controllers
    hostname: controller-1
    container_name: controller-1
    environment:
      KAFKA_PROCESS_ROLES: "controller"
      KAFKA_NODE_ID: 1
      KAFKA_LISTENERS: "CONTROLLER://controller-1:29092"
      KAFKA_CONTROLLER_QUORUM_VOTERS: "1@controller-1:29092,2@controller-2:29092,3@controller-3:29092"
      KAFKA_CONTROLLER_LISTENER_NAMES: "CONTROLLER"
      # Replace CLUSTER_ID with a unique base64 UUID using "bin/kafka-storage.sh random-uuid"
      # See https://docs.confluent.io/kafka/operations-tools/kafka-tools.html#kafka-storage-sh
      CLUSTER_ID: "MkU3OEVBNTcwNTJENDM2Qk"

  controller-2:
    image: confluentinc/cp-kafka:7.5.0
    profiles:
      - controllers
    hostname: controller-2
    container_name: controller-2
    depends_on:
      - controller-1
    ports:
      - "9093:9092"
      - "9102:9101"
    environment:
      KAFKA_PROCESS_ROLES: "controller"
      KAFKA_NODE_ID: 2
      KAFKA_LISTENERS: "CONTROLLER://controller-2:29092"
      KAFKA_CONTROLLER_QUORUM_VOTERS: "1@controller-1:29092,2@controller-2:29092,3@controller-3:29092"
      KAFKA_CONTROLLER_LISTENER_NAMES: "CONTROLLER"
      CLUSTER_ID: "MkU3OEVBNTcwNTJENDM2Qk"

  controller-3:
    image: confluentinc/cp-kafka:7.5.0
    profiles:
      - controllers
    hostname: controller-3
    container_name: controller-3
    depends_on:
      - controller-1
      - controller-2
    ports:
      - "9094:9092"
      - "9103:9101"
    environment:
      KAFKA_PROCESS_ROLES: "controller"
      KAFKA_NODE_ID: 3
      KAFKA_LISTENERS: "CONTROLLER://controller-3:29092"
      KAFKA_CONTROLLER_QUORUM_VOTERS: "1@controller-1:29092,2@controller-2:29092,3@controller-3:29092"
      KAFKA_CONTROLLER_LISTENER_NAMES: "CONTROLLER"
      CLUSTER_ID: "MkU3OEVBNTcwNTJENDM2Qk"
We can see that I added the following:
- KAFKA_CONTROLLER_QUORUM_VOTERS: “1@controller-1:29092,2@controller-2:29093,3@controller-3:29094”
- profiles: “controllers” — this is a docker compose feature that is useful for grouping services
After running docker compose --profile controllers up we should expect the following line in the logs:

Where we can see that all the nodes have been registered as voters in the quorum ✅
Now let’s add our brokers:
  broker-1:
    image: confluentinc/cp-kafka:7.5.0
    profiles: ["brokers"]
    hostname: broker-1
    container_name: broker-1
    ports:
      - "9095:9092"
      - "9104:9101"
    environment:
      KAFKA_NODE_ID: 4
      KAFKA_PROCESS_ROLES: "broker"
      KAFKA_LISTENER_SECURITY_PROTOCOL_MAP: "CONTROLLER:PLAINTEXT,PLAINTEXT:PLAINTEXT,PLAINTEXT_HOST:PLAINTEXT"
      KAFKA_ADVERTISED_LISTENERS: "PLAINTEXT://broker-1:9092,PLAINTEXT_HOST://localhost:29092" # Required for brokers
      KAFKA_CONTROLLER_QUORUM_VOTERS: "1@controller-1:29092,2@controller-2:29092,3@controller-3:29092"
      KAFKA_CONTROLLER_LISTENER_NAMES: "CONTROLLER"
      KAFKA_LISTENERS: "PLAINTEXT://broker-1:9092,PLAINTEXT_HOST://0.0.0.0:29092"
      KAFKA_INTER_BROKER_LISTENER_NAME: "PLAINTEXT"
      CLUSTER_ID: "MkU3OEVBNTcwNTJENDM2Qk"

  broker-2:
    image: confluentinc/cp-kafka:7.5.0
    profiles: ["brokers"]
    hostname: broker-2
    depends_on:
      - broker-1
    container_name: broker-2
    ports:
      - "9096:9092"
      - "9105:9101"
    environment:
      KAFKA_NODE_ID: 5
      KAFKA_LISTENER_SECURITY_PROTOCOL_MAP: "CONTROLLER:PLAINTEXT,PLAINTEXT:PLAINTEXT,PLAINTEXT_HOST:PLAINTEXT"
      KAFKA_ADVERTISED_LISTENERS: "PLAINTEXT://broker-2:9092,PLAINTEXT_HOST://localhost:29092" # Required for brokers
      KAFKA_JMX_PORT: 9101
      KAFKA_JMX_HOSTNAME: localhost
      KAFKA_PROCESS_ROLES: "broker"
      KAFKA_CONTROLLER_QUORUM_VOTERS: "1@controller-1:29092,2@controller-2:29092,3@controller-3:29092"
      KAFKA_CONTROLLER_LISTENER_NAMES: "CONTROLLER"
      KAFKA_LISTENERS: "PLAINTEXT://broker-2:9092,PLAINTEXT_HOST://0.0.0.0:29092"
      KAFKA_INTER_BROKER_LISTENER_NAME: "PLAINTEXT"
      CLUSTER_ID: "MkU3OEVBNTcwNTJENDM2Qk"

  broker-3:
    image: confluentinc/cp-kafka:7.5.0
    profiles: ["brokers"]
    hostname: broker-3
    depends_on:
      - broker-2
    container_name: broker-3
    ports:
      - "9097:9092"
      - "9106:9101"
    environment:
      KAFKA_NODE_ID: 6
      KAFKA_LISTENER_SECURITY_PROTOCOL_MAP: "CONTROLLER:PLAINTEXT,PLAINTEXT:PLAINTEXT,PLAINTEXT_HOST:PLAINTEXT"
      KAFKA_ADVERTISED_LISTENERS: "PLAINTEXT://broker-3:9092,PLAINTEXT_HOST://localhost:29092" # Required for brokers
      KAFKA_JMX_PORT: 9101
      KAFKA_JMX_HOSTNAME: localhost
      KAFKA_PROCESS_ROLES: "broker"
      KAFKA_CONTROLLER_QUORUM_VOTERS: "1@controller-1:29092,2@controller-2:29092,3@controller-3:29092"
      KAFKA_CONTROLLER_LISTENER_NAMES: "CONTROLLER"
      KAFKA_LISTENERS: "PLAINTEXT://broker-3:9092,PLAINTEXT_HOST://0.0.0.0:29092"
      KAFKA_INTER_BROKER_LISTENER_NAME: "PLAINTEXT"
      KAFKA_LOG_DIRS: "/tmp/kraft-combined-logs"
      CLUSTER_ID: "MkU3OEVBNTcwNTJENDM2Qk"
And start them with docker compose --profile brokers up . Wait for the brokers to finish starting up and then we can repeat the check on the cluster metadata:

Ok, now we finished the configuration but we are left wondering if the promised benefits of scalability and reliability are indeed there.
Test 1 — Scalability
First, we create a topic with a replication factor and partitions set to the number of brokers, which guarantees that there are enough partitions to be consumed by the brokers (the number of partitions should always be equal to or greater than the number of brokers) and that the messages are replicated across the topics. Second, we add a producer to the topic to be able to send messages. Third, we start a consumer in each one of the brokers, to see if they are indeed consuming the messages. The result is the following:

All brokers consumed messages. This increases the throughput of our system ✅
Points to notice:
- For demonstration purposes, I used broker-1 to create the topic and to create the producer. Any broker could have been used.
- I used a list containing all the brokers. This guarantees that if any of the brokers go down we are still connected to send messages.
- Kafka uses what is called sticky partitioning by default. That is why for each message I changed the key so they would not be consumed by one single broker.
Test 2— Reliability
Now let’s stop one broker and test if the messages are still being produced and consumed:

The system continued to work as expected. This means that our system is tolerant to broker failures which shows the reliability increase ✅
Points to notice:
- After stopping broker-1 (should have stopped another one 🤦♂) I had to connect to broker-2 to produce the messages.
- Broker-2 and Broker-3 continued to consume messages
- Messages that were stick to broker-1 (key-1) started being sent to broker-2
Now let’s restart broker-1 and see if it reconnects normally to the system:

We can see that broker-1 started consuming messages again ✅ (another benefit of having this setup is that we can perform maintenance without causing downtimes).
Test 3— Under partitioning a topic
I mentioned before that we should have at least the same number of partitions as the number of brokers, otherwise, some brokers may not consume any message. This is demonstrated in the following image:

Test setup:
- Stop broker-1. Add another broker (broker-4) and add a consumer in the same consumer group and topic. After that restart broker-1.
Result:
- Broker-1 does not consume any messages because all of the partitions are already assigned to another broker 👎
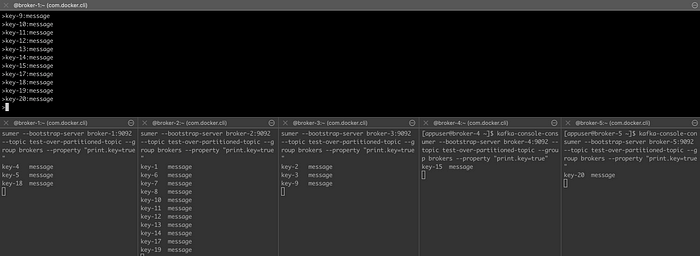
Now let’s try to fix the problem by creating another topic that is over-partitioned (more partitions than consumers). First, create the topic:
kafka-topics --create --bootstrap-server broker-1:9092 --topic test-over-partitioned-topic --partitions 5 --replication-factor=4Then let’s send the messages and see if they are consumed:

We can even add another broker to test:

All brokers consumed messages ✅
Test 4— Stop controller
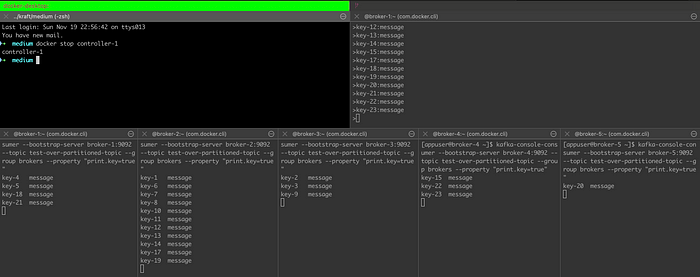
Let’s now stop one controller and see if the system continues to work:

The system continued to work as expected ✅
Now, we conclude this post on how to configure and do some basic testing for Kafka in KRaft mode. I hope you find this article helpful to kickstart your knowledge of this new way of running Kafka. In the next ones, I will explain how to improve the setup and get closer to a production-ready system.
Thanks for reading. Please feel free to leave any constructive feedback 🙌👏.